It is very common in a office environment to have several printer connected to a single computer acting as a Server PC. In that situation, you can add a shared printer to your workstation simply as follows:
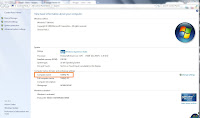
3.Now you have to find out what is the name of the PC the printer is connected to. For this, Go to that Computer, right click on "My Computer" and click 'Properties'. You will find the Computer Name there as shown on image below.
4.Then go to the "Device and Printer" from "Control Panel"
7. Now lets go back to 2nd step where we have to put the Computer name preceded by the printer name like this : \\Computer\Printer. For example , \\SERVER\HP LaserJet P1005.

- Go to Control Panel > Device and Printers > on the toolbar click 'Add Printer
- On the next windows, click on "Add a network, wireless or Bluetooth printer"
- It will search for all available shared printer on your Network and present a list of all of them.
- Click on the printer you want to add and click Next. It will then install the printer on your system.
1.On the 3rd step above, click on the "The printer that I want isn't listed"
2.Choose the secon option "Select a shared printer by name"
3.Now you have to find out what is the name of the PC the printer is connected to. For this, Go to that Computer, right click on "My Computer" and click 'Properties'. You will find the Computer Name there as shown on image below.
4.Then go to the "Device and Printer" from "Control Panel"
5.Right click the printer and click on "Printer properties"
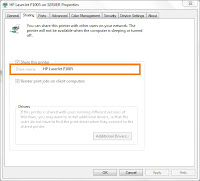
6.Go the second tab "sharing" and copy the share name. Make sure the "Share this printer" is ticked on.
7. Now lets go back to 2nd step where we have to put the Computer name preceded by the printer name like this : \\Computer\Printer. For example , \\SERVER\HP LaserJet P1005.

8.Click Next and if you input it correctly, Printer Installation will occur and the printer will be added to your workstation.